Every strong building begins underground. Here is the simple, right way to go from an empty plot of land to a solid, well-cured foundation — explained in plain language anyone can follow.
Imagine a bare piece of land. By the time a house stands on it, dozens of small decisions have already been made below the ground — and each one quietly decides whether the building will be safe or shaky. Most of this work is invisible once the construction is finished. That is exactly why it gets rushed, and why so many problems start here.
Good construction practices are nothing fancy. They are simply doing each early step the right way, in the right order, with safety and quality in mind. This guide walks you through that journey — clearing, fencing, digging, filling, concreting and curing — using the same standards (IS codes) that engineers rely on. And it shows where the right materials, from cement to TMT bars, make all the difference.
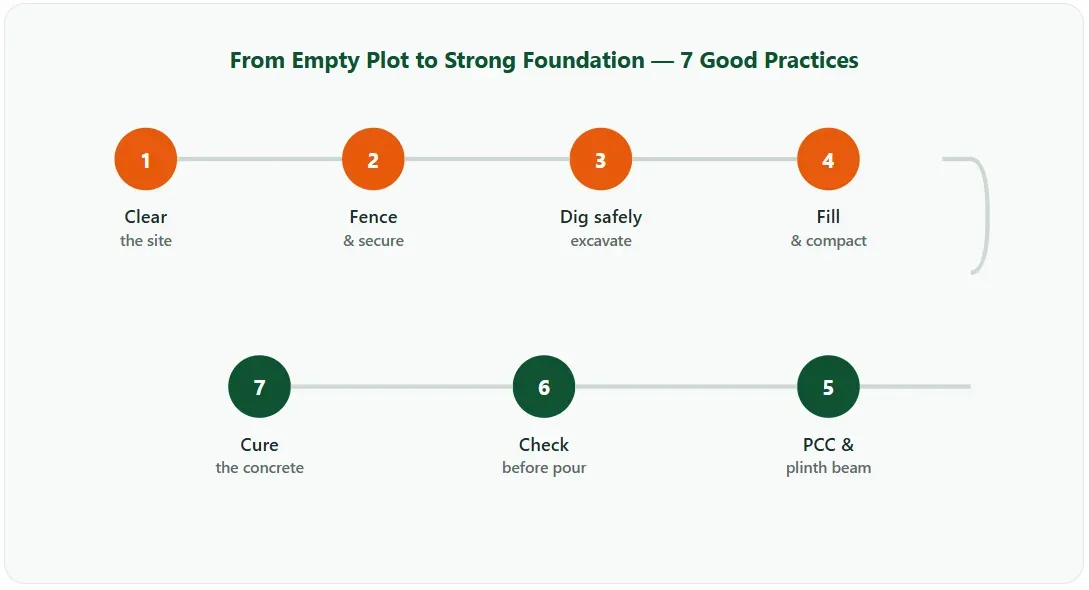 The seven good practices, in the order they actually happen on site.
STEP 1
Clear the Site Before Anything Else
The first job is to give yourself a clean, honest piece of ground to build on. That means removing bushes, trees, shrubs, weeds and grass — including the roots, not just the tops. Old structures are dismantled, and all the rubbish is carted away and disposed of properly.
It sounds basic, but roots and buried debris left behind can rot, settle or push against your foundation later. A smart builder also budgets for this clearing and disposal from the start, so it never becomes a surprise cost halfway through.
STEP 2
Fence the Site to Keep It Safe and Secure
Putting up temporary fencing is one of the very first safety steps on any site. A good fence keeps trespassers and curious children out, and keeps your stacked materials — cement, steel, blocks — secure from theft.
There are a few common, low-cost options: wire mesh fencing, barricades, pounded-post chain link, and panel chain link. The right choice depends on how long the project will run and how busy the surrounding area is.
STEP 3
Dig the Foundation — Safely
Now the real groundwork begins. Excavation looks simple, but it is one of the most dangerous parts of construction. There are two broad types, and they call for very different methods.
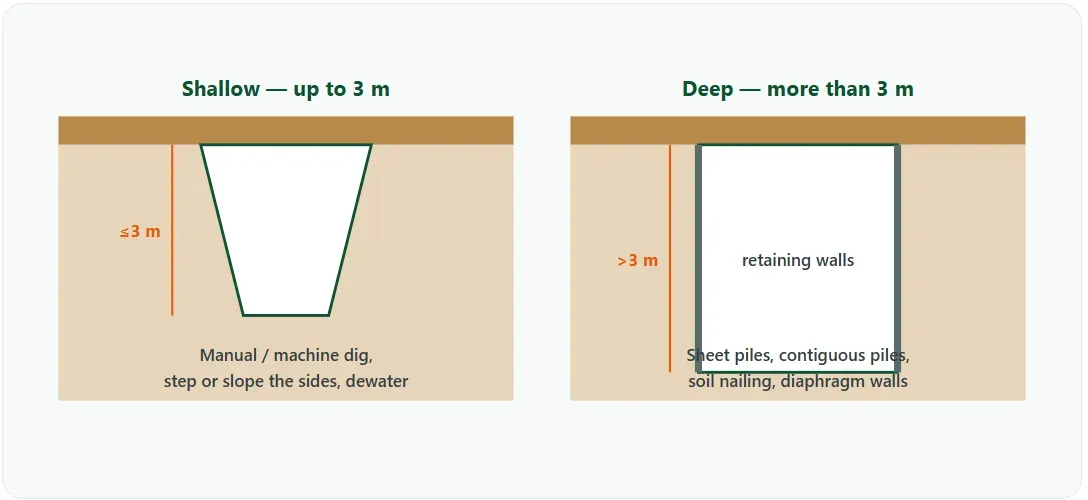 Shallow excavation (up to 3 m) versus deep excavation (more than 3 m), as used for basements and metro stations.
The safety rules that matter most
Excavation safety in India follows IS 3764 (Code of Safety for Excavation Work). A few rules are worth remembering even if you are not the engineer:
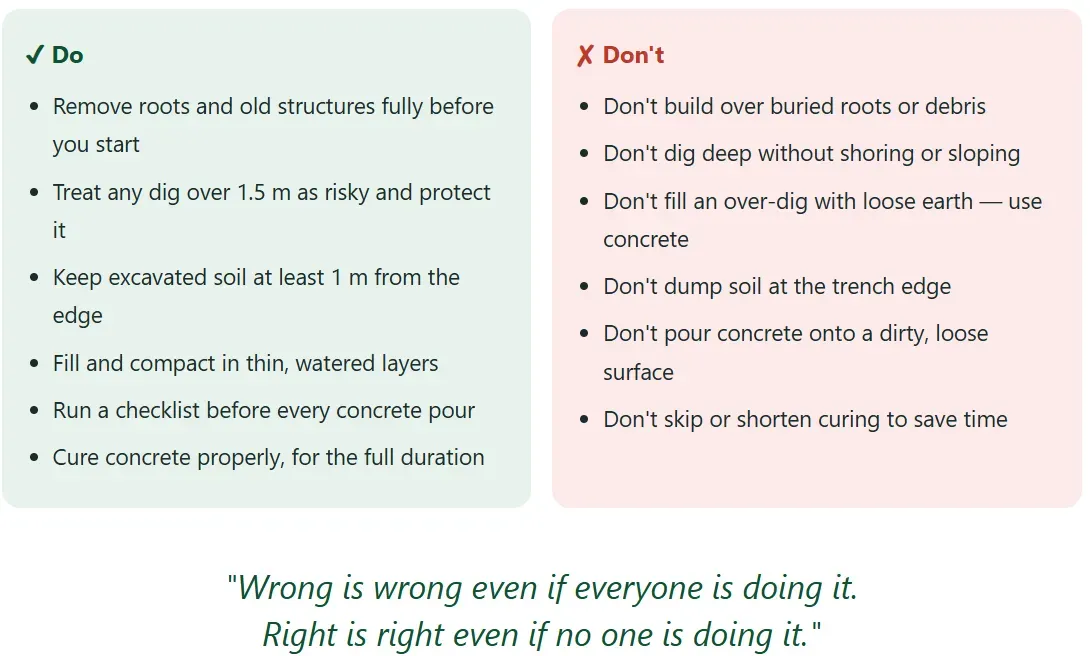
Any pit deeper than 1.5 metres is treated as risky and needs proper protection. Before digging, the site engineer must check for buried pipelines, sewers, gas lines and electrical cables. Workers inside a trench need ladders and scaffolds to get in and out. And here is one most people get wrong: excavated soil should not be dumped right at the edge — keep it at least 1 metre away from the trench, so the weight does not cause a collapse.
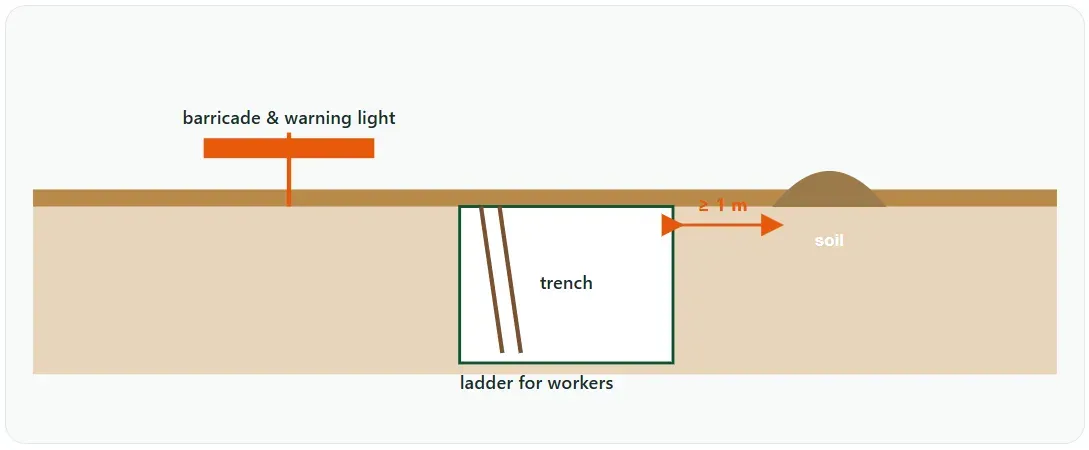 Three habits that prevent most trench accidents: keep soil a metre back, give workers a ladder, and barricade the edge.
A few more good habits: light the area well for night work, place warning lights for traffic and pedestrians, and put up guards or barricades wherever the public might fall in. In areas with snakes, insects or leeches, give workers boots, gloves and repellents and keep first-aid ready.
Watch out for hidden hazards: quicksand, waterlogged or saturated soil, vibration from nearby machinery, loose adjacent fills, and the weight (surcharge) of neighbouring buildings can all make a trench collapse without warning.
One rule protects your wallet too: if the digging goes deeper or wider than the drawing by mistake, that extra space must be filled back with concrete, not loose earth — and at the contractor's cost. Earth filling there would simply settle later.
STEP 4
Fill and Compact — In Thin Layers, Not All at Once
Once the foundation work is approved, the trenches are refilled back to ground level with good soil. The secret is patience: fill in thin layers of about 20 cm, water each layer, and ram it down hard before adding the next. Loose, dumped soil looks filled but will sink later and crack whatever sits on top.
For basement filling, the layers are even tighter — around 15 cm, well compacted, ideally at the right moisture content. When the filling reaches the final level, flood it with water for at least 24 hours, let it dry, then ram it again. This forces any settlement to happen now, not after your floor is laid.
STEP 5
Lay the PCC and Plinth Beam
Before any structural concrete goes in, the bottom of the foundation pit is dressed level, watered and rammed. Then comes a layer of Plain Cement Concrete (PCC) — a clean, level base that stops the main foundation from sitting directly on soil and soaking up moisture.
On top of the footings, the plinth (or grade) beam ties the structure together at ground level and helps spread the load evenly. Getting a flat, clean PCC base here makes every step above it easier and more accurate. This is the stage where consistent, properly mixed concrete — whether site-mixed or ready-mix concrete (RMC) — really pays off.
STEP 6
The Checklist Before You Pour Concrete
Once concrete is poured, mistakes are locked in. So good builders pause and run a quick checklist before the pour. Think of it as the last chance to catch a problem cheaply.
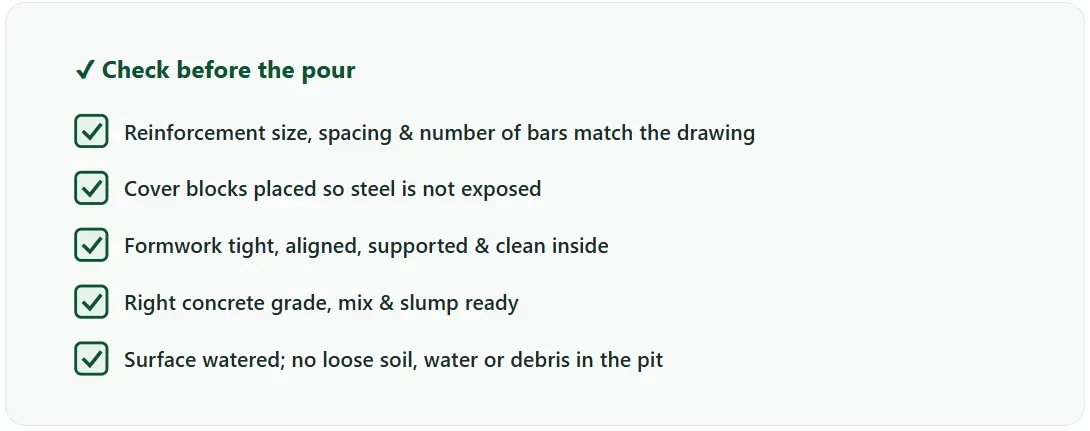 A simple pre-pour checklist that prevents the most common — and most expensive — concrete defects.
STEP 7
Cure the Concrete — The Step Everyone Rushes
Pouring concrete is not the finish line; it is the start of curing. Curing means keeping the concrete moist — ideally in an almost 100% humid environment — so the cement can fully react and harden. This is what actually gives concrete its strength, and it also reduces the early cracks caused by heat and shrinkage.
Skipping curing is one of the most common mistakes on Indian sites. The concrete may look fine, but it can lose a big share of its potential strength. There are a few proven methods:
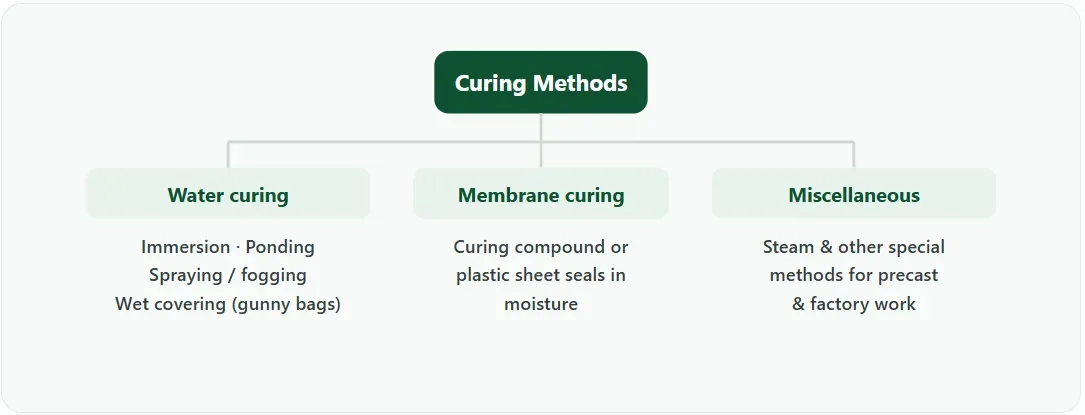 The main families of curing. For most building sites, water curing — ponding and wet covering — is the everyday workhorse.
This is where ConstroMat fits into your build
Good practices need good materials. ConstroMat connects builders, contractors and homeowners across East India with trusted brands of cement, TMT steel, bricks, blocks and ready-mix concrete — with clear pricing, quality you can rely on, and delivery to your site. You follow the right steps; we will get you the right materials.
Browse the Materials Catalogue →
Best Practices by Trade
The same care continues above the foundation. Here are the quick rules that matter most for the trades that follow — straight from field engineering practice.
Concreting
Use angular, cubical aggregate and the right water-cement ratio, and slump-test every batch for workability. Wet the surface first, compact with a mechanical vibrator without over-vibrating, lay heavy sections in layers, and always cast test cubes for RCC.
Brick Masonry
Lay bricks in proper header-and-stretcher bond with closers to avoid continuous vertical joints. Soak bricks well before use, keep mortar thickness uniform and every course truly level, rake joints for plastering, and reject unburnt or half-burnt bricks and bats.
Plastering
Before plastering, hack concrete surfaces, conceal electrical lines, and wet the wall. Keep thickness uniform using guide buttons — smooth inside, slightly rough outside. Finish corners and edges with rich mortar, give a drip bend at floor level, and avoid chipping.
Pressed Tiles
Soak pressed tiles for 24 hours before laying, keep them uniform and no thicker than half an inch, and wet the surface first. Pack each joint individually rather than spreading mortar over tiles, and mix packing mortar with waterproofing.
Flooring
Maintain a true, level base and keep the top rough to grip the finish. Hold uniform flooring-concrete thickness using gauges. For ceramic, vitrified or granite, use the specified thickness and mortar properly mixed with water — never dry mortar.
Quick Do's and Don'ts
The 7 Practices at a Glance
Stage | The right way to do it |
|---|---|
1. Clear the site | Remove bushes, roots, old structures & rubbish; budget for disposal |
2. Fence the site | Temporary fencing for safety and material security |
3. Excavate | Follow IS 3764; protect digs over 1.5 m; soil ≥1 m from edge |
4. Fill & compact | Thin layers (~20 cm), watered and rammed; flood basement fill 24 h |
5. PCC & plinth beam | Level, watered base; clean PCC; tie structure at plinth level |
6. Pre-pour check | Verify steel, cover, formwork, grade & cleanliness before pouring |
7. Cure | Keep concrete moist for full strength; water or membrane curing |
Why Good Practices Pay for Themselves
None of these steps is expensive on its own. What is expensive is skipping them — settled floors, cracked beams, leaking basements and repairs that cost many times more than doing it right the first time. Good construction practice is really just respect for the part of the building no one ever sees.
As Prof. Ralph B. Peck put it, civil engineering "is not an intellectual practice — it is action oriented." The right action, taken at the right step, is what makes a structure last.
Frequently Asked Questions
What are good construction practices?
They are the correct, safe, code-approved steps followed at every stage — clearing, fencing, excavation, filling, concreting and curing — so the structure ends up strong and long-lasting.
How deep can you dig without extra safety support?
As per IS 3764, any excavation deeper than 1.5 metres is treated as risky and needs protection like shoring, sloping or stepping the sides, plus ladders and barricades.
Why is curing concrete so important?
Curing keeps concrete moist so the cement reacts fully and gains strength, while reducing early cracks. Skipping it can sharply cut the final strength, even with good cement.
Building something soon?
Get cement, TMT bars, bricks, blocks and RMC from trusted brands — with transparent pricing and reliable delivery across Jharkhand, Bihar and beyond.
Saurabh Shankar
Expert contributor at ConstroMat, sharing insights on construction materials, industry trends, and best practices.
Written by
Saurabh Shankar
Expert contributor at ConstroMat, sharing insights on construction materials, industry trends, and best practices.
View all posts